Ingredients & Recipes
Adding Milk, Honey, and Oatmeal to Soap
Learn how to add milk, honey, and oatmeal to cold-process soap safely. Tips on freezing milk, working with honey, and dispersing oats for a gentler bar.
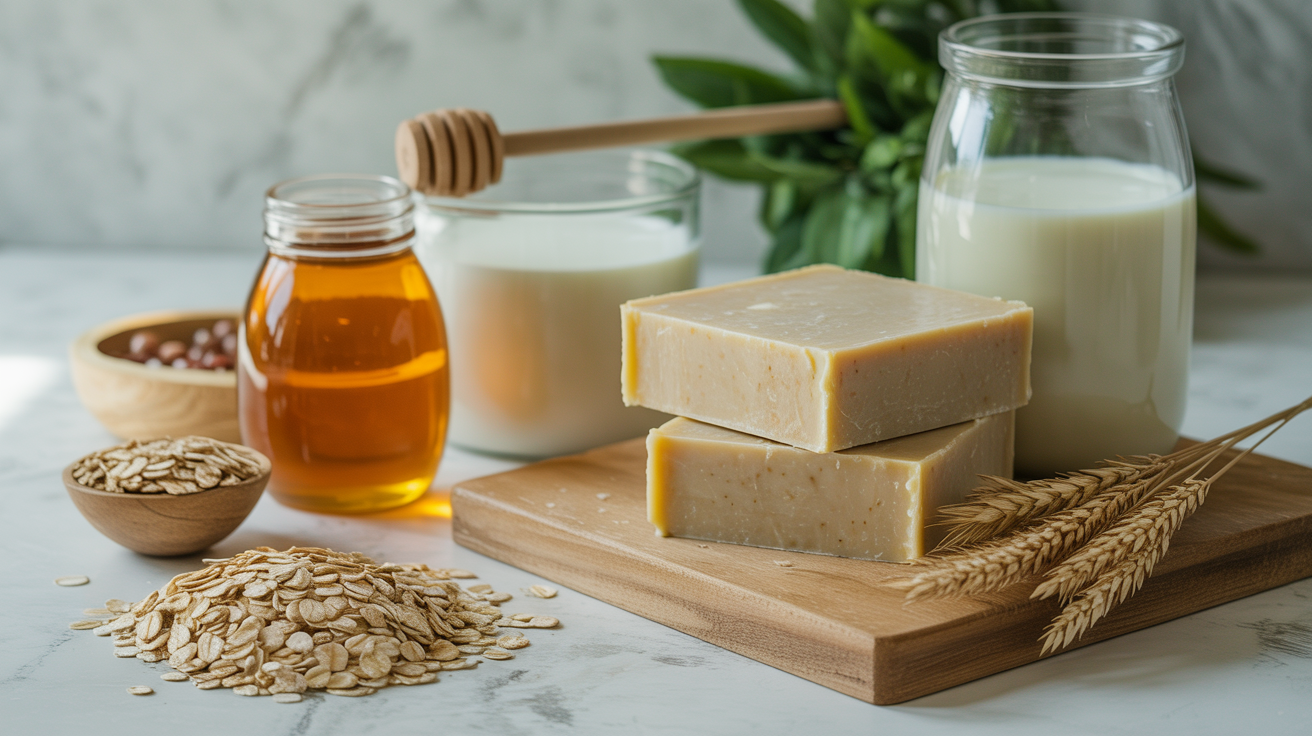
Milk, honey, and oatmeal have been used in skin-care preparations for centuries, and for good reason. Each one brings something useful to a bar of cold-process soap: milk proteins add a creamy lather, honey is a humectant that draws moisture to the skin, and finely ground oatmeal soothes and gently buffs away dry skin cells. Used together, they make a bar that feels noticeably different from a plain oil-and-lye batch.
The catch is that all three require a bit of technique. Milk scorches easily when it meets hot lye solution. Honey can push a soap batter to overheat during gel phase. Oatmeal, if added without grinding, can turn coarse and scratchy instead of gentle. This guide walks through each additive in turn, explains why it behaves the way it does, and shows you how to work with it safely.
Why These Additives Work in Soap
Milk contains lactose, fats, and proteins. The lactose reacts with lye in a process similar to caramelization, giving milk soaps a creamy color and a slightly richer lather. The proteins and fats add conditioning properties that plain water soap lacks.
Honey is roughly 80% sugar and 17-20% water, with trace minerals and enzymes. The sugars boost lather bubbles in a way similar to adding a small amount of sugar water to a recipe, and the humectant quality is preserved through saponification. A little goes a long way: 1 teaspoon per pound of oils is a reliable starting point.
Colloidal oatmeal is oats ground very finely so they disperse into the batter rather than settling out in clumps. It contains avenanthramides and beta-glucan, both known for calming irritated skin. In finished soap, it acts as a mild physical exfoliant and gives the bar a soft, almost silky texture on the skin.
Before you start, it helps to be comfortable with basic cold-process technique. If you are still finding your footing, reading through a simple beginner cold-process soap recipe first will make the steps below much easier to follow.
Working with Milk: Frozen, Fresh, and Powdered
The biggest challenge with milk in cold-process soap is the lye. Sodium hydroxide dissolved in liquid generates significant heat (around 180-200 F / 82-93 C), and that heat scorches the sugars and proteins in milk, turning it orange and creating a burnt smell that lingers in the finished bar.
There are three practical ways around this:
-
Freeze the milk into ice cubes. Replace all of the water in your recipe with frozen milk. Sprinkle the lye slowly over the frozen cubes, a little at a time, stirring between additions. The ice absorbs the heat as it melts, keeping the temperature well below 100 F (38 C) and protecting the sugars from scorching.
-
Use powdered milk. Dissolve full-fat dry milk powder into your oil phase rather than the liquid phase. This sidesteps the heat problem entirely. Use roughly 1 tablespoon per pound of oils, mixing it directly into your melted and cooled oils. Make your lye solution with plain water, let it cool, and proceed normally.
-
Use a partial milk split. A 50/50 blend of frozen milk and room-temperature water is gentler on the sugars than an all-milk batch and gives you more control if you find full milk recipes unpredictable.
Whichever method you use, bring the lye-milk mixture below 90 F (32 C) before adding it to your oils. This helps the finished soap cure to a creamy off-white rather than a bright orange.
Oil choice matters here too. Milk soap benefits from a high-conditioning blend. A recipe with 35-40% olive oil, 30% coconut oil, and the rest split between castor oil and a soft liquid oil like sweet almond or sunflower gives a bar that lathers well and feels gentle on dry skin. For a closer look at what each oil contributes, see the best oils for soap making and what each one does.
Adding Honey to Cold-Process Soap
Honey should be added at trace, not dissolved into the lye solution. Its sugar content encourages the soap to heat up aggressively during gel phase, which can be useful for a full gel but creates overheating trouble if the batter is already warm going into the mold.
How to add honey without problems:
- Thin the honey by stirring it into a tablespoon of one of your liquid oils before adding. This prevents it from sinking and clumping in the batter before it can fully incorporate.
- Add it at light trace, not thick trace. The batter needs to stay fluid long enough to distribute the honey evenly.
- Pour into a silicone loaf mold and skip insulation entirely. The towel wrap that keeps other batches in gel phase is not needed here. Honey generates its own heat; adding insulation on top can cause the soap to volcano out of the mold or develop a separation problem called ricing.
- Place the mold in the refrigerator for 24 hours if your soap room runs warm (above 70 F / 21 C). This slows the reaction and keeps the top smooth.
- Expect a slightly softer bar in the first few days. The extra sugars retain some moisture, so honey soap takes a little longer to firm up than plain cold-process batches.
A standard usage rate is 0.5 to 1 teaspoon per pound (450 g) of oils. Higher amounts tend to make the finished bar sticky and slow to harden.
Using Oatmeal as a Skin-Soothing Exfoliant
For soap, you want colloidal oatmeal: oats ground to a powder fine enough to disperse into the batter rather than sitting in chunks. A coffee grinder or high-powered blender works well. Blending rolled oats for 60-90 seconds gets most of the way there; sifting through a fine-mesh strainer removes any larger pieces that remain.
If you use coarser flakes or pieces, they absorb water during cure and soften into a texture that many people find scratchy rather than gentle. That outcome is the opposite of what you are going for with an oatmeal bar.
Three ways to add oatmeal:
- Dispersed in the batter: Stir 1-2 tablespoons of fine oat powder per pound of oils into the batter at trace. It distributes through the bar and adds a faint tan color.
- Pressed onto the top: Push whole or lightly crushed oats into the surface of freshly poured soap for a textured, visual finish. This creates a scrubby top layer but can mold in humid storage, so keep finished bars somewhere dry.
- Steeped as an oat tea: Simmer 2-3 tablespoons of oats in water, strain out the solids, and use the cloudy liquid as your lye water. This extracts beta-glucan without adding any texture to the finished bar, which is a good option if you want the skin-calming benefit without the exfoliant.
Oatmeal adds essentially no saponification value, so you do not need to adjust your lye calculator figures to account for it. For a refresher on how to set your superfat percentage and why it matters, see what is superfat in soap making.
A Sample Formula to Get You Started
This illustrative formula combines all three additives. Run your exact oil weights through a lye calculator before you make anything. The figures below are a starting-point framework, not a finished recipe.
| Ingredient | Amount per 1 lb (454 g) of oils |
|---|---|
| Olive oil | 40% (181 g) |
| Coconut oil | 30% (136 g) |
| Sweet almond oil | 20% (91 g) |
| Castor oil | 10% (45 g) |
| Lye water | Frozen goat milk; amount per calculator |
| Honey | 1 tsp, added at light trace |
| Colloidal oatmeal | 1 tbsp, added at light trace |
| Superfat | 5% |
Working temperatures: Aim to bring your oils to around 90-95 F (32-35 C) before adding the lye-milk mixture, which should also be at or below 90 F (32 C). Mixing at lower temperatures reduces the risk of the honey pushing the batch into overheating territory.
Cure time: Plan for at least 4-6 weeks. Milk and honey soaps tend to take longer to fully harden than plain recipes. Before using any bar, do a zap test: touch the tip of your tongue briefly to the cut edge. A sharp "zap" like a 9-volt battery signals unreacted lye; let the bars cure longer and test again before use.
Safety reminder for every lye session: Wear goggles and chemical-resistant gloves. Add lye to liquid, never liquid to lye. Work in a ventilated space and keep children and pets out of the area. Run every formula through a reputable lye calculator before you start.
Frequently Asked Questions
Can I use plant-based milks instead of dairy? Yes, with some variation in results. Coconut milk, oat milk, and almond milk all work. Plant-based options have less protein and fat than goat or cow milk, so the color payoff and creamy lather quality are more subtle. Freeze them the same way you would dairy milk to protect the sugars from scorching.
My honey soap turned dark and smells faintly burnt. What went wrong? The batter was likely too warm when poured, or the mold was insulated. The sugars in honey caramelize under heat quickly. A bar like this is cosmetically off but not unsafe if it is fully cured and passes a zap test. For the next batch: add honey at light trace, skip the towel, and refrigerate the mold overnight.
Why does my oatmeal soap feel scratchy instead of smooth? The oats were not ground finely enough. Rolled oats need 60-90 seconds in a high-powered blender to reach a truly fine, powdery consistency. After blending, sift through a fine-mesh strainer and discard any pieces that don't pass through.
How long do milk-and-honey bars stay fresh? Because of their unsaturated fats and natural sugars, milk soaps can develop orange spots called "dreaded orange spots" (DOS) faster than plain soaps. Store bars in a cool, dry place out of direct sunlight. Most milk soaps hold up well for 12-18 months under good storage conditions.
Can I use all three additives in the same bar? Yes, they work well together. Add honey and colloidal oatmeal both at light trace, and use the frozen milk method for the lye water. Expect a more active gel phase than you get with plain batches; these bars generate more internal heat, so refrigerating the mold overnight is the safer call.